


Objective
The objective of this use case is to demonstrate a Jenkins-based deployment flow for ABL code running on a PASOE instance. It focuses on the main setup steps, pipeline configuration and deployment logic needed to automate the process in an existing Progress OpenEdge environment.
Diagram
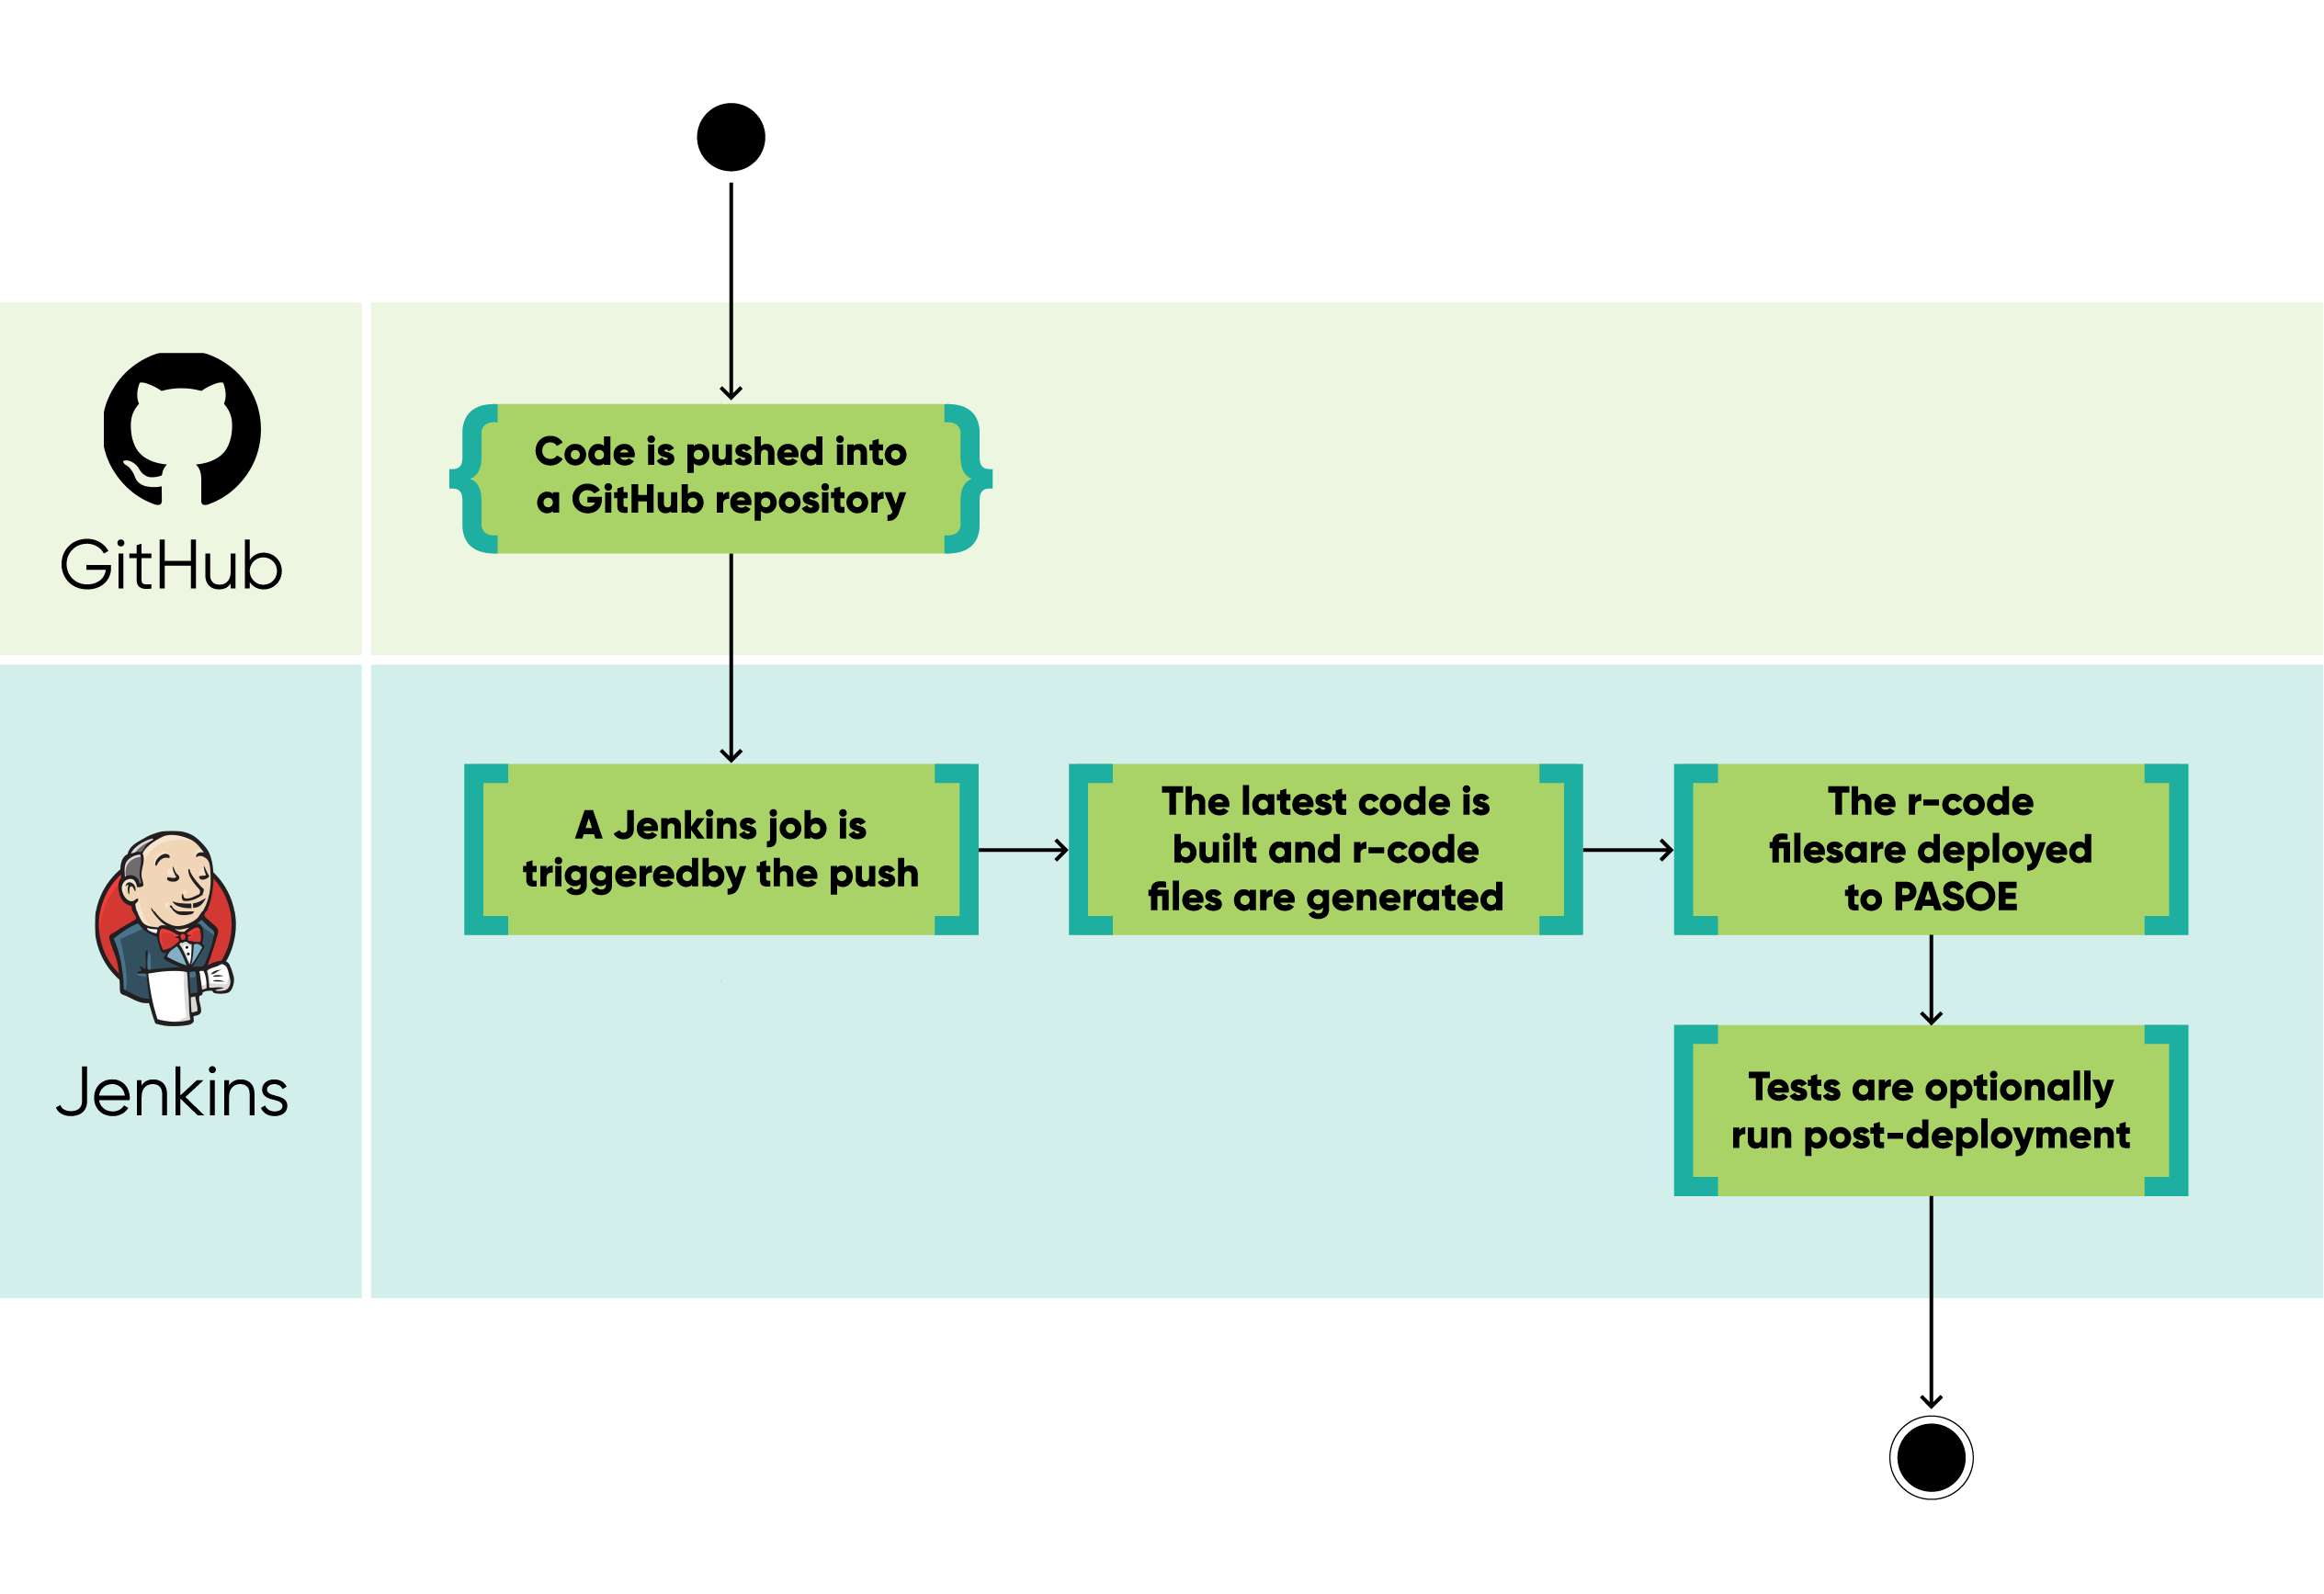
Solution Overview
The pipeline includes several key components:
- Developer: The developer writes ABL code locally and pushes it to a remote Git repository, such as GitHub.
- Git Repository: The Git repository stores the ABL code, r-code, Jenkinsfile and compile scripts.
- PASOE Instance: The PASOE instance provides the runtime environment for OpenEdge web applications.
- Jenkins: Jenkins is used to automate the build and deployment process. It checks out the code from the repository, compiles the ABL code, deploys the compiled r-code to the PASOE instance and restarts the instance when needed.
Setting Up Jenkins
- Download the Jenkins.war file. This can be done by clicking on this link: Download and deploy and choosing to download the generic Java package.java
- Run Jenkins. Open the command prompt on your system and type in the following command:
java -jar \jenkinsDirectory\jenkins.war
The lines bellow in the command prompt will indicate that Jenkins has been successfully run. If this is your first time running Jenkins, it will generate a password that you will have to use when logging into Jenkins on the web. - Open Jenkins. Open your preferred web browser and navigate to Jenkins using the appropriate address and port. If you're running Jenkins on localhost with the default port, the URL will be http:/localhost:8080/. Please note that localhost is used here as an example, since standard practice typically involves hosting Jenkins on a dedicated server or another host.
- Set up your account. When you open Jenkins for the first time, you will have to set up your account by creating a Username that you will use to login from that point forward. After you've finished setting up your account, you will be greeted by the Jenkins dashboard.
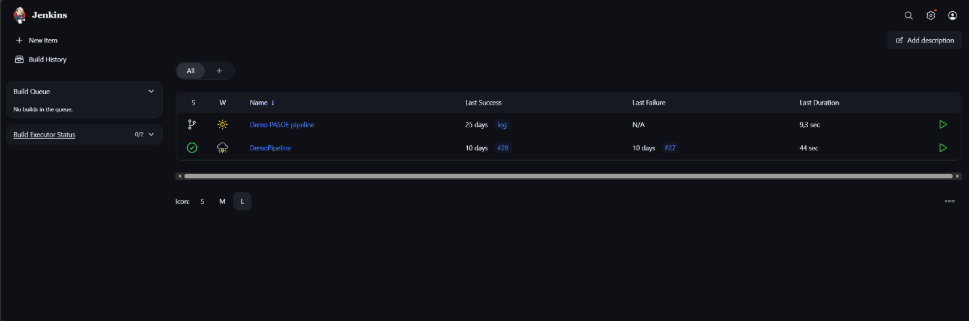
After Running Jenkins, you should see something like this:

The view of the Jenkins Dashboard:
Preparing the Pipeline
Before creating the actual pipeline, the following steps were completed:
- A PASOE instance was created.
- Sample ABL code was written.
- A remote Git repository was set up.
- An SSH key was created for secure repository access.
Creating a PASOE instance
For this use case, a PASOE instance called oepasTest3 was created by doing the following steps:
- Starting the Admin server by running the command:
proadsv --start. - Creating the instance itself by running the command:
pasman create -p (HTTP port for instance) -s (SSL port) -N (Instance name) - v -f (folder or path for PASOE location)
For the purposes of this Use Case, the command that was used looked like this:
pasman create -p 9910 -p 9911 -s 9912 -N oepasTest3 -v -f oepasTest3 - Optionally running the instance using:
pasman run (Instance name)
Writing sample ABL code
For this use case, simple ABL code was used.
Below is the main sample procedure:
procedure DemoProc:
  define buffer bEmployee for Employee.

  define input parameter  cPosition     as character.

  define output parameter cEmpFirstName as character.
  define output parameter cEmpLastName  as character.

  find first bEmployee no-lock where
             bEmployee.Position = cPosition no-error.

  if not available bEmployee then
  do:
    message "There is no such Employee".
    assign
      cEmpFirstName = ""
      cEmpLastName  = "".
  end.

  cEmpFirstName = bEmployee.FirstName.
  cEmpLastName  = bEmployee.LastName.

end.
A compile.p file was also created to compile the code in the CI/CD pipeline and generate the r-code files.
os-create-dir value("rcode").
def var cfile as character no-undo.
def var cfull as character no-undo.
cfull = "src".
input from os-dir(cfull).
repeat:
  import cfile.
  if cfile matches "*.p" then
    compile value(cfull + "\" + cfile) save into "rcode".
end.

input close.

os-create-dir value("tests/rcode").
cfull = "tests".

input from os-dir(cfull).
repeat:
  import cfile.
  if cfile matches "*.p" or cfile matches "*.cls" then
      compile value(cfull + "\" + cfile) save into "tests/rcode".
end.

input close.
Setting up a Git Repository and SSH Key
For this setup to work, an SSH key was created on the computer and added to the Git repository.
SSH keys provide a secure way to authenticate your computer with the Git repository without having to re-enter a username and password every time you interact with it. An SSH key consists of two cryptographic keys:
- A private key, which remains on the local machine.
- A public key, which is added to the Git repository.
In this use case, GitHub was used as the remote Git service. However, any provider that supports SSH authentication can be used.
When you attempt to connect to GitHub, the system checks whether the public key on GitHub and the private key on your machine form a valid pair. If they do, the connection is authenticated securely.
To create and add the SSH key:
- Open Command Prompt.
- Use command ssh-keygen.
- Two files were generated, one of regular file type the other of .old (in some documentation it's written that the file can be .pub).
- On your remote Git hosting service (in this case, GitHub), navigate to the appropriate account settings (for example, Account → Settings → SSH and GPG keys on GitHub) and create a new SSH key.
Alongside this a new repository was created and the code shown above was pushed into said repository.
Creating The Jenkins Pipeline
Before creating the pipeline, the SSH key must be added as a credential in Jenkins. This credential is used by Jenkins to access the repository.

After the credential is added, create the pipeline by selecting: New Item → Pipeline.
Pipeline Stages and Jenkinsfile
Inside the pipeline settings, a Jenkinsfile needs to be defined. This file describes the pipeline stages that Jenkins will execute after checking out the code from the repository.
The Jenkinsfile used in this use case was written in Groovy syntax.
pipeline {
  agent any
  parameters {
    string(name: 'BRANCH_NAME', defaultValue: 'main', description: 'Git branch to build')
  }
  environment {
    DLC = "C:\\Progress\\OpenEdge"
    BUILD_DIR = "C:\\Repos\\RepoForJenkins"
    SRC_DIR = "C:\\Repos\\RepoForJenkins\\src"
    RCODE_DIR = "C:\\Repos\\RepoForJenkins\\rcode"
    DB = "C:\\OpenEdge\\WRK\\sports2023"
  }
  stages {
    stage('Checkout') {
      steps {
        echo "Checking out source code."
        git branch: "${params.BRANCH_NAME}",
        url: '[email protected]:your/repository.git',
        credentialsId: 'jenkinsId'
      }
    }
    stage('Start Database'){
      steps{
        bat '''
        call "C:\\Progress\\OpenEdge\\bin\\proenv.bat"
        if %ERRORLEVEL% EQU 0 (
          echo Database is NOT running. Starting it...
          proserve C:\\OpenEdge\\WRK\\sports2023 -pf C:\\OpenEdge\\WRK\\sports2023.pf
        ) else (
          echo Database is already running. Proceeding.
        )
        '''
      }
    }
    stage('Start PASOE Instance'){
      steps{
        bat '''
        call "C:\\Progress\\OpenEdge\\bin\\proenv.bat"
        pasman start oepasTest3
        '''
      }
    }
    stage('Build') {
      steps {
        bat """
        call "%DLC%\\bin\\proenv.bat"
        cd "%BUILD_DIR%"
        "%DLC%\\bin\\_progres" -b -db "%DB%" -p compile.p
        """
      }
    }
    stage('Deploy to PASOE'){
      steps{
          bat '''
              xcopy /E /Y "%RCODE_DIR%\\*.*" "C:\\OpenEdge\\WRK\\oepasTest3\\ablapps\\JenkinsDemonstration\\"
              '''
      }
    }
    stage('Restart PASOE Instance') {
      steps {
        bat '''
            call "C:\\Progress\\OpenEdge\\bin\\proenv.bat"
            pasman stop oepasTest3
            pasman start oepasTest3
        '''
      }
    }
  }
  post {
    success {
        echo "Deployment completed successfully!"
    }
    failure {
        echo "Deployment failed!"
    }

  }

}
Pipeline stages:
- Checkout. The repository with the ABL code is checked out. The credential with the SSH key is used to check out the repository.
- Start Database. Starts the sports2023 database that the ABL code uses.
- Start PASOE Instance. The PASOE instance that was created earlier has started.
- Build. The ABL code is compiled, r-code files are produced after compilation.
- Deploy to PASOE. Given that the ABL code that was used for this is simple (no API integration and such), only the r-code files were deployed to the PASOE instance directory.
- Restart PASOE Instance. This was added for mostly debugging purposes as whether the files were actually deployed or not can be seen in the PASOE instance prompt.
Triggering The Pipeline
In Jenkins, pipelines can be triggered automatically. This section uses GitHub as an example of a Git service.

If the goal is to trigger the build whenever new code is pushed to the repository, the GitHub hook trigger for GITScm polling option should be selected. This requires a webhook to be configured in GitHub.
Please note that for a webhook to work, Jenkins should not be running on localhost. If Jenkins is running locally, a third-party tunnelling tool may be required.
Creating a GitHub Webhook
To create a webhook, open the repository, go to settings and click on ‘webhooks’.
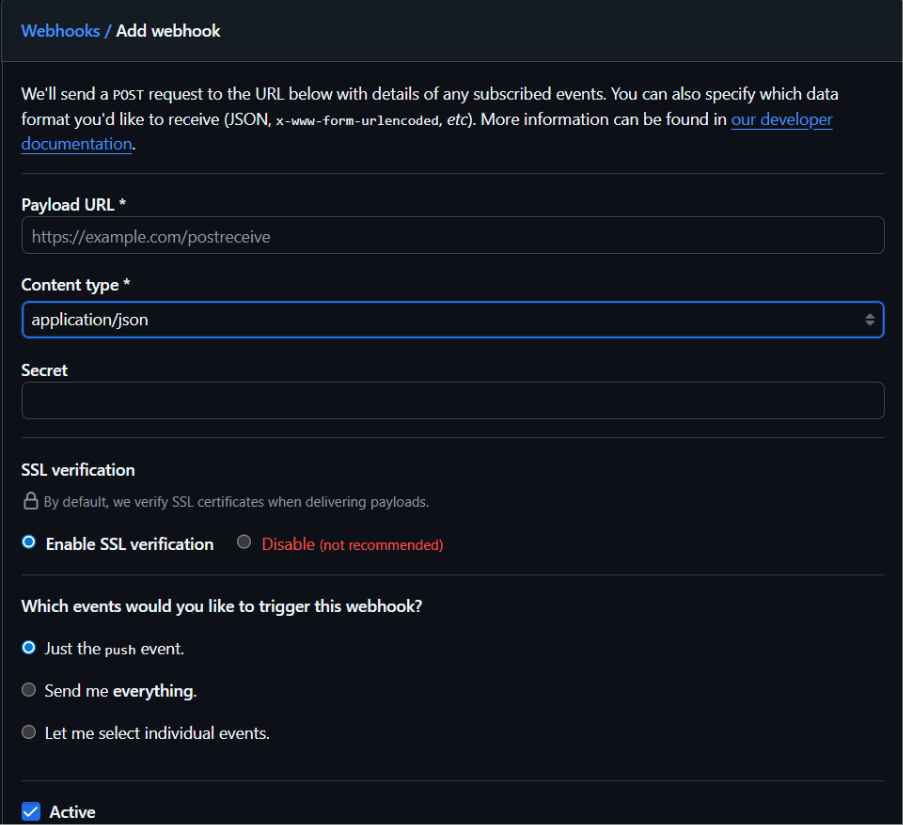
In the Payload URL, write the jenkinsURL/github-webhook, select Content Type as application/json. Select Just the push event and then Add Webhook.
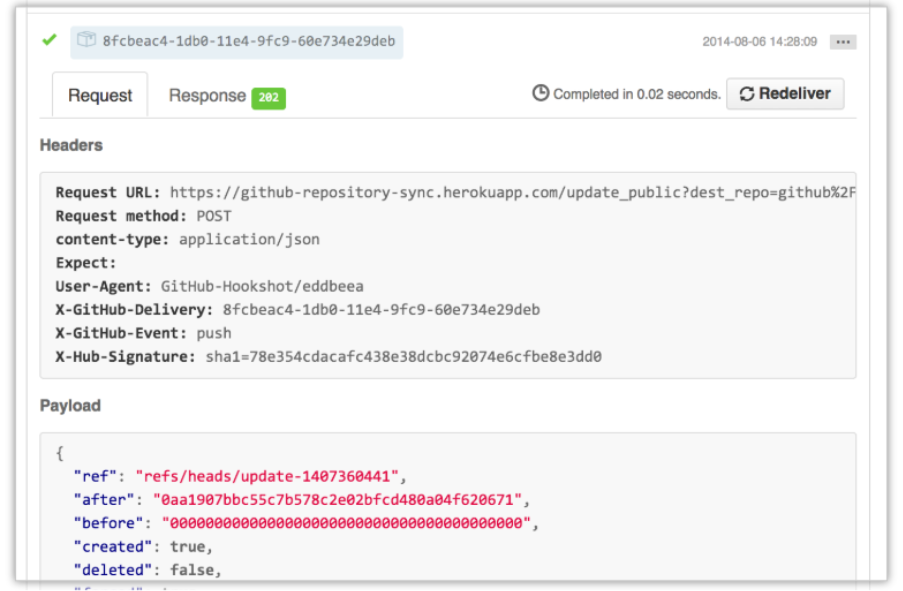
In the image below is an example of a github webhook request (image source).
When GitHub sends a webhook request, it is delivered as an HTTP POST message with two main parts: the header and the payload.
In the POST request header, you'll typically find:
- Content-Type: Often set to "application/json", indicating that the payload is in JSON format.
- X-Hub-Signature or X-Hub-Signature-256: A header containing a hash signature generated using a secret key, allowing the receiving server (like Jenkins in this case) to verify that the payload came from GitHub.
- X-GitHub-Event: This header indicates which event triggered the webhook (for example, "push", "pull_request", etc.).
- Additional metadata such as user agent information and a unique delivery ID that can help track and troubleshoot webhook deliveries.
The Payload is a JSON formatted body that includes detailed information about the event. For instance, in a push event payload, you would see:
- The branch or ref that was pushed.
- Details about the commits, including commit messages, author information, and timestamps.
- Repository information, such as the repository name, URL, owner, etc.
- The pusher’s information showing who initiated the push.
If you prefer not to trigger the job on every push, an alternative would be to use the Build periodically trigger, which pulls the newest code from the repository and builds it based on specific scheduled time, which, in Jenkins, is written in the cron syntax.
Below is an example of a Jenkins pipeline build schedule. In this case the schedule means: Build once every hour at varying intervals.

The pipeline is now fully configured and will run according to the specified schedule. In the example above, it is set to execute every hour.
Additional Pipeline Options
While the current pipeline is primarily focused on building and deploying ABL code to a PASOE instance, there are several other pipeline configurations you might consider for a more robust CI/CD setup:
- Syntax Check Pipeline: Runs ABL compiler to ensure code compiles correctly without any errors.
- Unit Test Pipeline: Executes unit tests (usually using a tool like ABLUnit) to validate functionality of individual components.
- Static Analysis Pipeline: Uses tools like SonarLint/SonarQube to check cod equality and enforce coding standards.
- Integration Pipeline: Automates the deployment of the compiled artefacts to the PASOE instance. May include integration tests to verify the seamless operation of the deployed application within the runtime environment.
Outputs
The main outputs of this use case are:
- An automated build pipeline using Jenkins.
- An updated PASOE instance.
- Compiled and deployed build artifacts.
- Fewer repetitive manual tasks for developers.
- A more consistent build and deployment process.
- Reduced risk of manual deployment errors.
Since this use case covers only part of the broader Kubernetes deployment model presented in the original PUG Challenge session, a possible next step would be to implement the full model.
Challenges
PASOE and ABL are not natively supported in Jenkins, and there are no official Jenkins plugins for this type of setup. As a result, compilation and deployment need to be handled through custom scripts.
Another challenge is that Docker is not used in this setup, which means the pipeline depends heavily on the local environment. This can make the configuration more sensitive to machine-specific paths, installed versions and local dependencies.
Making PASOE Deployment More Repeatable
This use case shows that Jenkins can help automate PASOE deployment even without Docker or a fully containerised setup. By connecting Jenkins with a Git repository, compile scripts and a PASOE instance, teams can reduce manual work and make ABL code deployment more consistent.
While this setup still depends on the local environment and custom scripts, it can be a useful starting point for teams that want to introduce more structure into their OpenEdge CI/CD process before moving towards a broader Kubernetes or GitOps model.
Want to Automate OpenEdge Deployments? Baltic Amadeus can help you build a more reliable CI/CD process for OpenEdge and PASOE applications. Contact our team.