


The Journey
1) Generating a sample OpenEdge project with AI
To start, I asked AI to generate a small OpenEdge project with around ten files. The project included a simple menu UI, some file input and output, and basic calculations.
The AI asked several clarifying questions and then returned a ZIP file with instructions.
The first version did not compile. I copied the compiler errors back to AI and iterated until the project finally worked. AI also inserted comments where it intentionally introduced bad coding practices. This made it easier to test custom rules later.
2) Running SonarQube in Docker
Next, I installed Docker Desktop for Windows and launched the official SonarQube image from Docker Hub.
At first, I left the port set to 0 so Docker would assign one automatically. This turned out to be a mistake. Each container restart changed the host port, which meant I constantly had to update the URL and configuration.
The solution was simple: bind SonarQube to a static port.
3) Project structure and sonar-project.properties
I created a minimal properties file in the project root sonar-project.properties ('rnd2' was my OpenEdge project name):
.png)
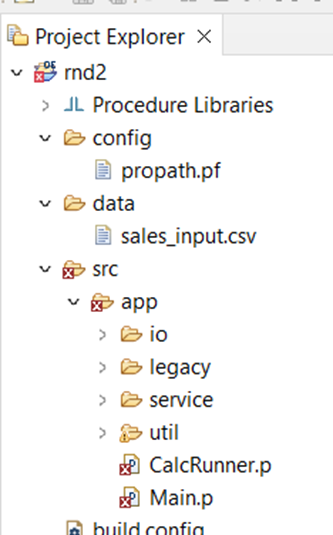
Here’s the structure of my project files (src included into PROPATH):
4) First login, plugins, and early mistakes
After launching SonarQube, I logged in and created a new project.
I initially followed instructions generated by AI to install OpenEdge related plugins. That approach turned out to be misleading.
I missed two important pieces:
- ANT / PCT setup
- the CABL license
The missing CABL license was the main blocker. Once I followed the official Riverside documentation and installed their OpenEdge plugin JAR files from the Riverside SonarQube OpenEdge plugin releases, things started to work as expected.
Interestingly, scans worked without ANT and PCT. My assumption is that the AI-generated project used simple paths and a standard structure.
5) Installing plugin JARs inside the Docker container
At first, I didn’t set up a bind mount. I used Docker Desktop → Files tab to upload a folder into /tmp, then opened a root shell and moved the JARs:
‘Sonarqube’ is the container name. Root user is best to copy files to the usual location.
From Windows terminal:
docker exec -it --user root sonarqube /bin/bash
mv /tmp/plugins/* /opt/sonarqube/extensions/downloads/
Then I restarted the container so SonarQube would install the plugins at startup. (Better to use a bind mount, but this worked while I was experimenting.)
6) Running SonarScanner on Windows
Next, I downloaded the Windows x64 SonarScanner, extracted it, and generated a user token in SonarQube. Because of my earlier port 0 mistake, I had to update URLs between restarts. This was another reason to stick to 9000 from the start. Here is how my properties file looked:

With the plugins installed, I ran the command from my OpenEdge project folder:
<..>\sonar-scanner-8.0.1.6346-windows-x64\bin\sonar-scanner.bat
After the scan completed, I refreshed the project page in SonarQube to view the results.
Initially I had some issues with:
- Quality gates
- Rule profiles
- Enabling rules
The root cause was again the missing CABL license. After fixing that, the OpenEdge rules behaved normally.
The first successful scan already detected several issues in the codebase. That meant the environment was finally ready for custom rules. You can download the scanner from the SonarScanner CLI documentation.
7) Creating a custom rule (template + AI)
Once the scanning pipeline worked, I moved on to custom rule development. I downloaded Riverside’s rules-plugin-template and reviewed their slide deck explaining the architecture.
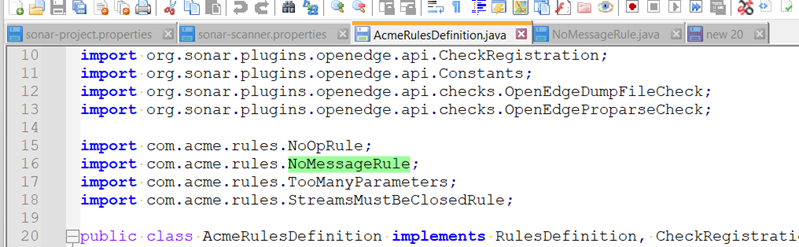
Then I asked AI to generate a Java rule and dropped it into the template. I registered it in AcmeRulesDefinition.java (two places), following the NoOpRule and TooManyParameters examples.
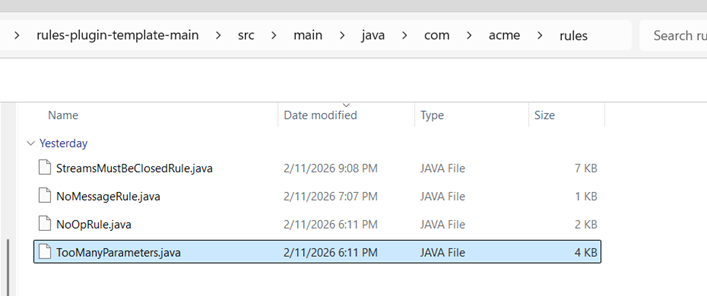
Take a look at where I placed the Java rule:
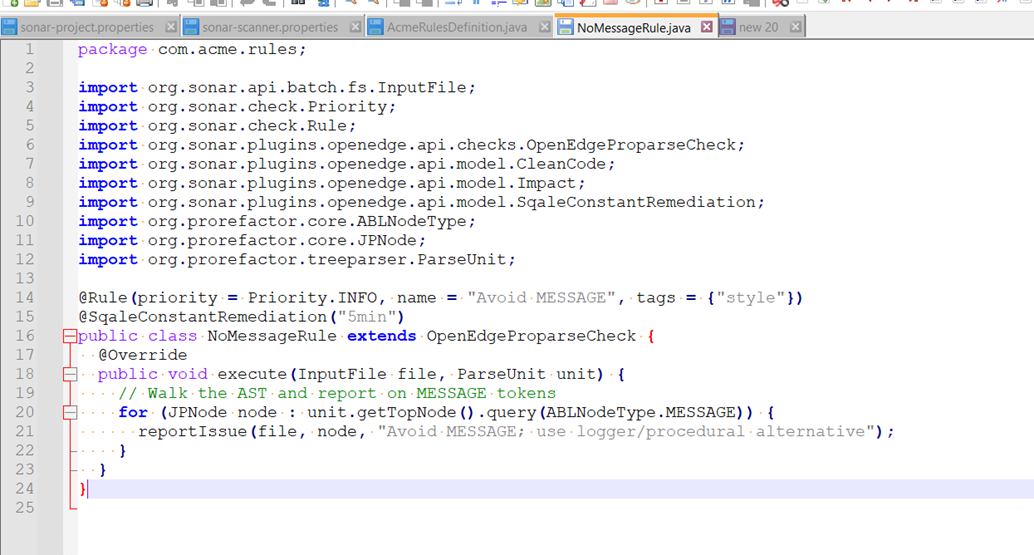
The generated rule source:
Registration in AcmeRulesDefinition.java:
Important to point out that I downloaded the Riverside rules plugin template and reviewed the SonarQube custom rule development documentation before creating my first rule.
8) Building the plugin and activating the rule
To compile the rule plugin, I installed Maven and built the template project.
From the project root:
<..>/apache-maven-3.9.12/bin/mvn clean package
Maven generated the plugin JAR successfully. I then copied the JAR into the SonarQube container using the same manual method as before and restarted the container. After the restart, the new rule appeared in the SonarQube interface. It was disabled by default, so I enabled it in the rule profile.
Running the scanner again produced the first result. The report highlighted locations in the code where MESSAGE statements were used. The first custom rule worked.
9) Extending the rules
After the first success, I experimented with additional rules. One example was StreamsMustBeClosedRule. This stage introduced several new challenges:
- Maven compilation errors caused by incorrect imports.
- Rules loading but not appearing in the UI.
- Rules appear but don’t detect issues.
This was expected. AI is useful for generating starting points, but the output still needs human validation and correct integration. In 2026, it would be unusual not to use AI. However, generated content is only a starting point. It still requires human judgement and proper integration.
Conclusion: What This Setup Taught Me
This experiment helped me understand how the full SonarQube setup works in practice. Running SonarQube in Docker, configuring SonarScanner, installing the OpenEdge plugin, and handling the CABL licence were all important steps. Small configuration choices, such as using a dynamic Docker port, can quickly create unnecessary problems.
AI was helpful for generating a sample OpenEdge project and drafting rule ideas, but it’s only a starting point. The generated code still needs human judgement, verification, and proper integration. Once the environment is set up correctly, creating and testing custom rules becomes much easier. Tools like SonarQube can play an important role in maintaining code quality in long-running or legacy systems.


